


Garden sheds across the country harbour forgotten tools that once served their purpose but now gather dust and rust. Rather than discarding these relics of seasons past, transforming them into bird-friendly features offers a creative solution that benefits wildlife whilst adding character to outdoor spaces. Birds face increasing challenges in finding suitable habitats, food sources and shelter, particularly in urban and suburban environments. By repurposing old garden equipment, homeowners can provide essential resources for feathered visitors whilst embracing sustainable practices that reduce waste. These projects require minimal investment and offer maximum impact for both garden aesthetics and local bird populations.
Recycle shovels into hanging feeders
Selecting the right shovel for conversion
Old shovels with worn handles or rusted blades make excellent candidates for feeder conversions. The metal scoop naturally forms a basin that holds seeds, whilst the handle provides a convenient mounting point. Choose shovels with intact bowls, even if the edges show signs of deterioration. Rust adds character and poses no danger to birds, though excessive corrosion might compromise structural integrity. Smaller hand trowels work equally well for compact feeding stations suitable for finches and tits.
Assembly and installation methods
Creating a shovel feeder involves several straightforward steps that require basic tools and materials:
- Drill drainage holes in the bowl to prevent water accumulation
- Attach sturdy chains or rope through holes drilled in the handle
- Secure perching branches or dowels along the edges using wire
- Apply weatherproof sealant to wooden handles for longevity
- Hang from tree branches or purpose-built stands at appropriate heights
Position feeders between 1.5 and 2 metres above ground to deter predators whilst remaining accessible for refilling. The angled surface of most shovel blades creates a natural viewing platform that allows birds to survey surroundings whilst feeding, addressing their instinctive safety concerns.
Maintenance considerations for shovel feeders
Regular cleaning prevents disease transmission amongst bird populations. Remove old seed weekly and scrub the metal surface with a stiff brush and diluted disinfectant solution. Rinse thoroughly before refilling. Monitor for sharp edges that develop through weathering and file these smooth to protect delicate feet.
These hanging feeders naturally complement other garden features, particularly when positioned near areas where birds can rest between feeding sessions.
Transform rakes into functional perches
Preparing rake heads for mounting
Broken rakes with missing teeth or damaged handles retain value as multi-level perching stations. The spacing between tines provides ideal separation for multiple birds, reducing competition and territorial disputes. Remove the handle completely or cut it to a manageable length for wall mounting. Clean metal components thoroughly and treat wooden elements with bird-safe preservatives.
Creative mounting arrangements
Rake heads adapt to various installation styles depending on available space and aesthetic preferences. Mount horizontally against fences or shed walls to create linear perching galleries. Alternatively, attach vertically to posts for a sculptural element that doubles as functional bird furniture. Consider these placement strategies:
- Position near feeders to provide waiting areas
- Install adjacent to birdbaths for preening spots
- Arrange multiple rakes at staggered heights
- Combine with climbing plants for integrated natural appearance
Enhancing rake perches with accessories
| Accessory | Purpose | Installation method |
|---|---|---|
| Small bells | Audible deterrent for cats | Wire to outer tines |
| Suet holders | Additional food source | Hang from centre tines |
| Mirror fragments | Predator awareness | Attach to backing board |
The versatility of rake perches makes them particularly valuable in gardens where space limitations prevent installation of larger structures. Their presence encourages birds to linger longer, increasing opportunities for observation.
Providing perching options naturally leads to considering water sources, which prove equally essential for attracting diverse species.
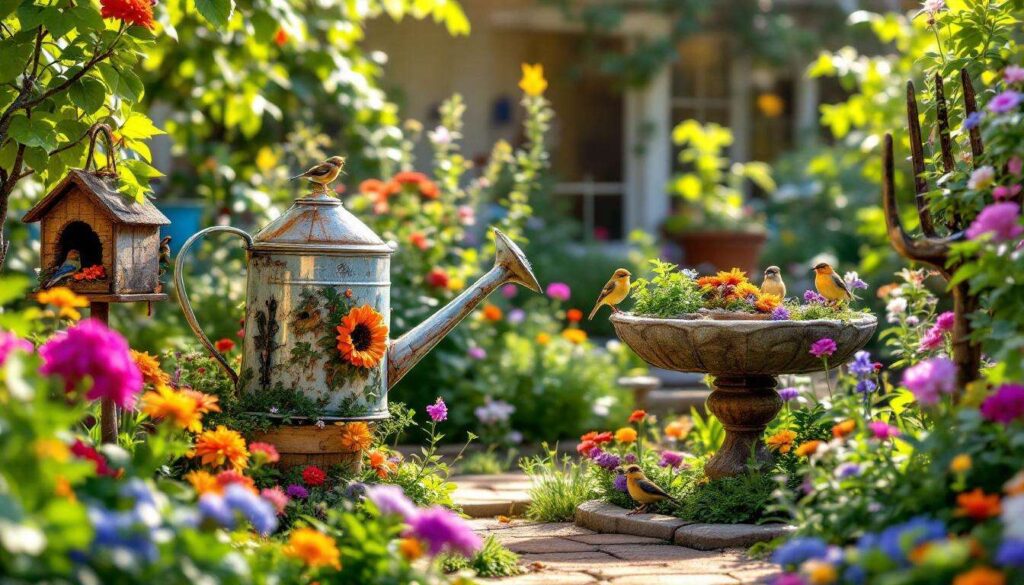
Create birdbaths with old watering cans
Designing tiered water features
Vintage watering cans with leaking bases or damaged spouts find new purpose as charming birdbaths. Their varied sizes allow creation of multi-level water features that accommodate different bird species. Large cans suit pigeons and thrushes, whilst smaller vessels attract wrens and robins. Position cans at angles that allow water to pool in the body whilst the spout creates a gentle cascade effect.
Installation techniques for stability
Secure watering can baths require thoughtful anchoring to prevent toppling during use. Embed the base in soil or gravel, or mount on sturdy posts using brackets. For suspended installations, thread strong rope through the handle and hang from branches. Ensure the water surface remains level regardless of mounting method. Add flat stones inside deeper cans to provide shallow bathing areas and escape routes for insects.
Water quality and seasonal care
Maintaining clean water proves crucial for bird health. Empty and refill baths every two to three days during warm weather, more frequently in summer. Scrub interior surfaces weekly with a stiff brush to remove algae and debris. During winter, break ice daily or install small heating elements designed for outdoor water features. Never add chemicals such as antifreeze, which prove toxic to wildlife.
Water features naturally attract birds seeking refreshment, but they also require safe roosting and nesting locations nearby.
Design birdhouses from old pots
Selecting appropriate containers
Clay pots, metal buckets and ceramic vessels all serve as effective birdhouse foundations. Choose containers with drainage holes or capacity for drilling entrance openings. Terracotta pots offer excellent insulation properties, whilst metal containers suit species preferring cooler nesting environments. Avoid treated wood containers or those with chemical residues that might harm nestlings.
Modification specifications for different species
| Bird species | Entrance diameter | Interior depth | Mounting height |
|---|---|---|---|
| Blue tits | 25-28mm | 150mm minimum | 2-4 metres |
| Robins | Open front | 100mm minimum | 1-2 metres |
| House sparrows | 32mm | 150mm minimum | 2-4 metres |
Construction and weatherproofing steps
Converting pots into functional birdhouses requires attention to several critical details:
- Drill entrance holes at precise diameters using hole saws
- Add ventilation holes near the rim for air circulation
- Create drainage by enlarging existing holes in the base
- Install removable lids or bases for annual cleaning access
- Apply external waterproof sealant whilst keeping interiors untreated
- Add small perches below entrances using twigs or dowels
Position houses away from prevailing winds and direct afternoon sun. Face entrances between north and east to minimise weather exposure. Secure mounting prevents predator access and provides stability during storms.
Whilst nesting boxes address breeding requirements, some larger equipment offers opportunities for more ambitious protective structures.
Customise old lawnmowers into bird shelters
Safety preparations before conversion
Decommissioned push mowers provide substantial shelter frameworks once rendered completely safe. Remove all blades, sharp components and fuel residues thoroughly. Dismantle engine parts from motorised models and clean chassis extensively. The hollow body and protective housing create naturally sheltered spaces that appeal to ground-feeding species and those seeking refuge during inclement weather.
Structural modifications for bird use
Transform mower bodies by creating multiple access points whilst maintaining weather protection. Cut additional openings in sides and rear panels, ensuring edges remain smooth and safe. Line interiors with natural materials such as cork bark or untreated wood panels. Add roosting bars at varying heights using branches or bamboo poles. Elevate the entire structure on bricks or wooden blocks to improve drainage and deter ground predators.
Landscaping integration techniques
Position converted mowers within established garden beds where surrounding vegetation provides additional concealment. Plant climbing species around the structure to create living camouflage that blends the shelter into its environment. Consider these enhancement options:
- Surround with berry-producing shrubs for natural food sources
- Create brush piles nearby for supplementary cover
- Install solar-powered lighting for evening observation
- Add water dishes secured to flat surfaces
These substantial shelters prove particularly valuable during harsh weather when birds require protected spaces for extended periods. Their size accommodates multiple individuals simultaneously, supporting social species that roost communally.
Repurposing forgotten garden tools into bird-friendly features demonstrates how creative thinking transforms potential waste into valuable wildlife resources. Each conversion project addresses specific avian needs whilst contributing to sustainable garden management. From feeding stations crafted from shovels to comprehensive shelters built from redundant mowers, these adaptations provide essential support for local bird populations. The combination of practical functionality and aesthetic appeal ensures these features enhance gardens visually whilst serving important ecological purposes. By implementing even one or two of these projects, gardeners actively participate in conservation efforts that begin at home, creating spaces where both plants and wildlife flourish together.