


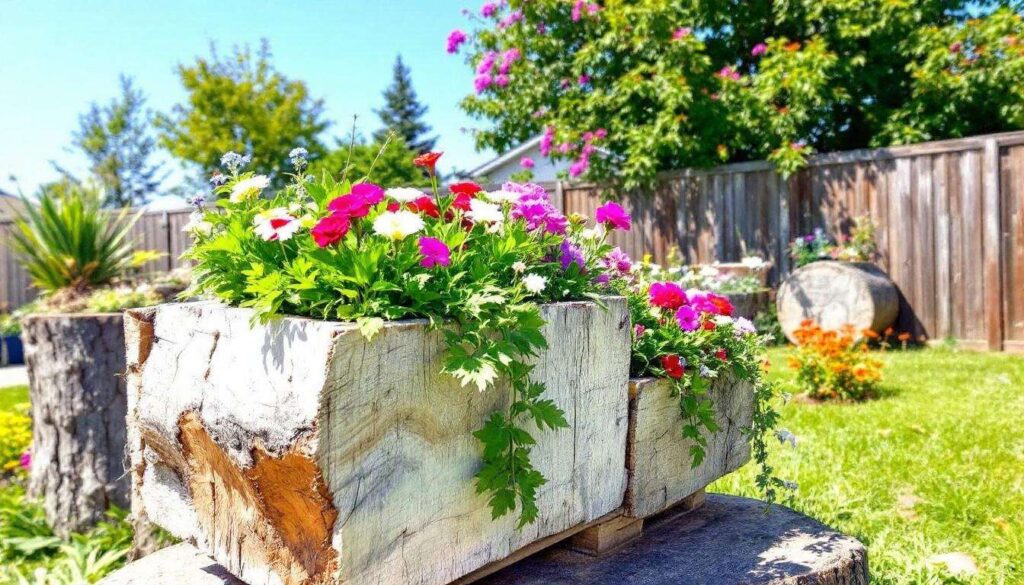
Transforming neglected garden materials into functional outdoor features offers both environmental benefits and creative satisfaction. Old tree stumps, often viewed as eyesores requiring expensive removal, can become the foundation for unique planters when combined with reclaimed wooden pallets. This sustainable approach breathes new life into discarded materials whilst adding rustic charm to outdoor spaces. The process requires minimal investment, basic tools, and a willingness to experiment with natural textures and forms.
Select and prepare the wood pieces
Assessing the tree stump condition
Begin by examining the structural integrity of your tree stump. The wood should be sufficiently solid to support additional materials, though some decay actually enhances drainage capabilities. Stumps measuring between 30 and 60 centimetres in diameter provide ideal proportions for planter construction. Check for active insect infestations, particularly termites or carpenter ants, which could compromise the structure over time.
Remove loose bark and debris using a wire brush, then allow the stump to dry naturally for several days. This preparation ensures better adhesion when applying protective treatments later. Consider the stump’s height: those between 40 and 70 centimetres tall create comfortable viewing levels for most garden settings.
Selecting suitable pallet wood
Not all pallets suit garden projects equally well. Prioritise pallets stamped with HT (heat-treated) markings rather than MB (methyl bromide), as the latter contains harmful chemicals. The ideal candidates display these characteristics:
- Minimal warping or splitting in the boards
- Consistent thickness of approximately 15-20 millimetres
- Absence of oil stains or chemical residues
- Secure nails without excessive rust
Dismantle the pallet carefully using a pry bar and hammer, preserving the longest boards intact. Sand rough edges with 80-grit sandpaper to prevent splinters whilst maintaining the wood’s weathered aesthetic.
Once your materials meet these standards, you can proceed to construct the framework that will transform these humble components into a cohesive planter design.
Build the basic structure of the box
Creating the planter frame
Measure the stump’s top diameter and design a box that either sits directly atop or wraps around the upper portion. For a top-mounted design, cut four pallet boards to create a square or rectangular frame that extends 5-10 centimetres beyond the stump edge. This overhang provides visual balance and practical planting space.
| Stump diameter | Recommended box dimensions | Board quantity needed |
|---|---|---|
| 30-40 cm | 45 x 45 cm | 8-10 boards |
| 40-50 cm | 55 x 55 cm | 10-12 boards |
| 50-60 cm | 65 x 65 cm | 12-14 boards |
Assembling the sides
Construct the box walls by attaching boards vertically or horizontally to corner posts cut from thicker pallet sections. Galvanised screws measuring 40-50 millimetres provide superior weather resistance compared to nails. Pre-drill holes to prevent splitting, especially near board ends.
Aim for a box depth of 20-30 centimetres to accommodate adequate soil and root development. Leave 5-millimetre gaps between horizontal boards to facilitate drainage and air circulation. This spacing prevents waterlogging whilst maintaining structural cohesion.
With the box structure complete, attention turns to securing this framework firmly to the stump base.
Techniques for attaching the pallets to the stump
Direct mounting methods
For stumps with relatively flat tops, position the box frame directly onto the surface. Drill pilot holes through the box bottom into the stump at four corner points and one central location. Use 100-millimetre wood screws or lag bolts for maximum stability. This method works best when the stump wood remains firm enough to grip fasteners securely.
Alternatively, create a recessed fitting by carving a shallow depression in the stump top using a chisel or chainsaw. This integrated approach enhances stability and creates a seamless visual transition between stump and planter.
Bracket and support systems
When dealing with irregular stump surfaces or softer wood, metal L-brackets offer reliable attachment solutions. Install brackets at 15-20 centimetre intervals around the box perimeter, securing one bracket leg to the box and the other to the stump side. This distribution of mounting points prevents tilting and accommodates the stump’s natural contours.
For particularly large or heavy planters, consider these reinforcement options:
- Wooden cleats screwed horizontally across the stump top
- Wire or rope lashing through pre-drilled holes
- Concrete adhesive applied to contact surfaces
- Wooden stakes driven into the ground alongside the stump
Secure attachment establishes the foundation, but the planter’s visual appeal depends largely on thoughtful finishing touches.
Enhance aesthetics with natural finishes
Protective treatments and stains
Apply linseed oil or tung oil to nourish the wood whilst allowing its natural grain to shine through. These penetrating finishes provide weather protection without creating impermeable barriers that trap moisture. Apply two coats with a brush, allowing 24 hours drying time between applications.
For those preferring coloured finishes, exterior wood stains in earth tones complement garden environments beautifully. Cedar, walnut, and weathered grey shades harmonise with natural surroundings whilst highlighting the wood’s texture. Avoid glossy finishes, which appear incongruous in rustic designs.
Decorative embellishments
Enhance the planter’s character through subtle additions that respect its organic origins. Preserved moss pressed into bark crevices creates textural interest, whilst copper wire wrapped around sections adds metallic accents that develop attractive patinas over time.
Consider these finishing touches:
- Stencilled botanical motifs using outdoor paint
- Carved initials or dates commemorating the creation
- Decorative nail heads arranged in patterns
- Reclaimed metal hinges or handles as ornamental features
With the structure aesthetically refined, selecting appropriate plants ensures the planter fulfils its intended purpose.
Choose the ideal plants for your planter
Matching plants to container conditions
The planter’s dimensions and drainage characteristics dictate suitable plant selections. Shallow boxes measuring 20-25 centimetres deep accommodate herbs, succulents, and shallow-rooted perennials most successfully. Deeper constructions support small shrubs and vegetables with more extensive root systems.
Consider the stump’s location when selecting plants. Sunny positions suit Mediterranean herbs like rosemary, thyme, and lavender, whilst shadier spots favour hostas, ferns, and impatiens. The rustic aesthetic pairs particularly well with cottage garden favourites and native wildflowers.
Recommended plant combinations
| Light conditions | Suggested plants | Height range |
|---|---|---|
| Full sun | Geraniums, petunias, sedums | 15-40 cm |
| Partial shade | Begonias, violas, heucheras | 20-35 cm |
| Full shade | Hostas, ferns, ajuga | 25-50 cm |
Create visual interest through layered planting: position taller specimens centrally with trailing varieties like ivy or lobelia cascading over the edges. This vertical dimension maximises the planter’s impact whilst softening the geometric box structure.
Successful planting establishes the foundation, but ongoing care determines the feature’s longevity and continued beauty.
Maintain and nurture your creation
Watering and feeding requirements
Container plants require more frequent watering than ground-planted specimens due to limited soil volume. Check moisture levels daily during warm weather, watering thoroughly when the top 2-3 centimetres feel dry. The drainage gaps prevent waterlogging, but consistent moisture remains essential for healthy growth.
Apply liquid fertiliser fortnightly during the growing season, diluted to half the recommended strength. This moderate feeding approach prevents nutrient buildup whilst supporting vigorous flowering and foliage development.
Seasonal care and preservation
Inspect the planter structure each autumn, tightening any loosened screws and reapplying protective finishes to areas showing wear. Remove dead plant material promptly to prevent fungal issues and maintain visual appeal. In regions experiencing hard frosts, consider these winter protection strategies:
- Moving tender plants to sheltered locations
- Wrapping the planter with hessian or bubble wrap
- Applying extra mulch around plant bases
- Elevating the structure slightly to prevent ice contact
The stump itself continues decomposing gradually, enriching the surrounding soil. This natural process typically unfolds over 5-10 years, meaning your planter evolves alongside the garden’s changing character.
Repurposing tree stumps and pallets demonstrates how discarded materials gain new purpose through creative vision. This project combines practical woodworking skills with horticultural knowledge, resulting in distinctive garden features that celebrate sustainability. The techniques outlined accommodate various skill levels whilst encouraging personalisation through material selection, finishing choices, and planting schemes. Regular maintenance ensures these planters provide years of enjoyment, proving that garden beauty often emerges from the most unexpected sources.